Continous Integration
The repos use continous integration to ensure regression and validity of the repo and automatically publish the documentation online if everything is valid.
This documentation will provide you some information and pointer to external documentation, if you wish to update/upgrade the CI.
Deploying the CI infrastructure
First of all, you may need to deploy gitlab runner in order to be able to run the continous integration (CI).
To do so, please refer to the official documentation.
Preparing the tests
The python test suite is done using tox as testing suite. The
configuration of tox is done in the file pyproject.toml.
In this configuration some command may be already defined to use other test tools such as :
- shellcheck: Shell script analysis tools
- mkdocs: A static site generator to document project with Markdown
You can read this file to understand what is done and refer to previous link to know how to use testing suite tools.
To run the testing suite tools, simply run the following command:
# Assuming you are in the root of the repo and you install python dev requirements
tox
Preparing the publication of the documentation
The second step to do is to prepare the server on which you will publish the documentation with the CI. This step will assume your server is accessible using SSH allowing the use of SSH private key.
To prepare the publication of your documentation, you will need two informations:
- The public SSH key of your server
- Your private SSH key that will be used to deploy your documentaiton on your server.
The public SSH key of your server
You will need the public SSH key of your server trust your server in your CI
process. Assuming your server domain is mydomain.tld, you can get its public
SSH key with the following command:
ssh-keyscan mydomain.tld
Output of the command should be like following:
# mydomain.tld:22 SSH-2.0-OpenSSH_7.4p1 Debian-10+deb9u7
mydomain.tld ssh-rsa THISISAVERY[. . .]verylongstring
# mydomain.tld:22 SSH-2.0-OpenSSH_7.4p1 Debian-10+deb9u7
mydomain.tld ssh-ed25519 THISisa[. . .]verylongstring
# mydomain.tld:22 SSH-2.0-OpenSSH_7.4p1 Debian-10+deb9u7
mydomain.tld ecdsa-sha2-nistp256 thisisa[. . .]longstring
Line that will interest us this the one with ecdsa-sha2-nstp256, the one
higlighted above. Keep it in mind or in a temporary file.
Your private SSH key
To be able upload to your documentation to your server you will need to generate a passphrase-less SSH private key.
Doesn't a passphrase-less SSH key will lead to security issues ?
Indeed, this could lead to security issues if this SSH key is able to connect to your server without any limitation. Hopefully, we can setup SSH connection such that use of this key can be limited to the use of a single command. This will be explain later.
First generate the passphrase-less SSH key, this can be done with the command
ssh-keygen.
ssh-keygen -f "</path/to/output/file" \
           -C "<explicit comment>" \
           -t "<type>" -b "<size>" -N "<passphrase>"
Description:
ssh-keygenallow lots of thins (seeman ssh-keygen), here we use it to generate an SSH private and public key.- Options:
-f "</path/to/output/file>": this option allow to specify where the private key will be stored, usually in~/.ssh/. In our example, we will call save it as${HOME}/.ssh/passwordless_ci_docs.-C "<explicit comment>": this option allow you to add a comment in you SSH key, public and private key. Usually online tutorial ask your to put your email address but you can put everything you want. I personnally tend to use explicit long comment. In our example, we will usePasswordless SSH key for CI to upload documentation on mydomain.tld server.-t "<type>": this option is to specify the type of key to create. In our case we will usersa.-b "<size>": this option is to specify the number of bits in the key to create. In our case we will use4096.-N "<passphrase>": this option allow you to specify or update a passphrase of the SSH key. In our case, as we do not want to set a passphrase, the value will be"". NEVER USE THIS OPTION UNLESS YOU KNOW WHAT YOUR ARE DOING, indeed, using such option may leak your passphrase as it will be recorded in your command history. In this special case, we use it as we do not set any passwphrase with our SSH key.
So, let us now generate our private and its associated public key:
ssh-keygen -f "${HOME}/.ssh/passwordless_ci_docs" \
           -C "Passwordless SSH key for CI to upload documentation on mydomain.tld server" \
           -t "rsa" -b "4096" -N ""
Which will output something like:
Generating public/private rsa key pair.
Your identification has been saved in /home/username/.ssh/passwordless_ci_docs
Your public key has been saved in /home/username/.ssh/passwordless_ci_docs.pub
The key fingerprint is:
SHA256:1fbkPbpzzEAmibtCHTWxmbxTGK+I2ohDm5+xwSkLCnE Passwordless SSH key for CI to upload documentation on mydomain.tld server
The key's randomart image is:
+---[RSA 4096]----+
|           o.    |
|          .+B    |
|          +*=o.  |
|        .+.++* . |
|. E.   .S.o++ o..|
| o. = =. o  ... .|
|.. * B..  .  .+  |
|o . = =. .   ..+ |
|.  . +  .    .o  |
+----[SHA256]-----+
This will generate two files:
- ~/.ssh/passwordless_ci_docs, your private SSH key
- ~/.ssh/passwordless_ci_docs.pub, its associated public SSH key
Now we need to setup our server mydomain.tld to accept connection from this
SSH key but restrict usage of this key to specific command in specific folder.
This will add a little layer of security to the usage of this key.
We will restrict the usage of this key to the usage of rsync in a specific
folder in our server mydomain.tld. In particular, using the script rrsync
provided with the package rsync. This will assume you have installed rsync
on your server.
Let us setup the rrsync script in our server. In our server, enter the
following commands:
gunzip /usr/share/doc/rsync/scripts/rrsync.gz -c > ~/rrsync
chmod u+x ~/rrsync
Once the script is setup and executable, you will need to configure the
authorized connection from our previously generated SSH key. To do so, add the
following content to the file ~/.ssh/authorized_keys, create it if it does not
exists.
command="$HOME/rrsync </path/to/authorized_synced/folder>",no-agent-forwarding,no-port-forwarding,no-pty,no-user-rc,no-X11-forwarding <content of your public SSH key>
Replace </path/to/authorized_synced/folder> by the folder (and its subfolder)
in which you authorize the rsync command when using your passphrase-less SSH
key. For instance, assuming you have configured your web server on your server
mydomain.tld to render content of the folder ${HOME}/www, and you want to
allow this key to only sync with an subfolder docs withing it, assuming it
exists, then the value will be ${HOME}/www/docs.
Also replace <content of your public SSH key> with the content of the public
key file generated which your private SSH key. In our exemple it is the content
of ${HOME}/.ssh/passwordless_ci_docs.pub.
So, the content to add to ${HOME}/.ssh/authorized_keys is:
command="$HOME/rrsync $HOME/www/docs",no-agent-forwarding,no-port-forwarding,no-pty,no-user-rc,no-X11-forwarding ssh-rsa AAAAB3NzaC1yc2EAAAADAQABAAACAQCheV2cl7I33QStP0ix/tXA0TGEd7EAHoYPW9CbBWuVfgZQLUIPIw+RLNI/GFYkeQsM7s/Yz+2xf1zYR5qf4Sm22tS8IusjZqYPXttRzkV6wnReT/l0HuRg5tqxrz/qIeZtvBeJCM1Bf+HHgd8cnKzXA44/Agac2RVDVZolUQAYOrCuhHgensdts9efwaEi9IobrvaTvXLXtCHK8at7ZzTZDPKU6Fm7SHRYSp5VNNplkRxPkS42QmC2QeYydTeEIBgnUveaWmiq9pHVOa5LkcVxaTMI2FuX2gXRrvB4CIpkr2rHospCaAKNqbXzwkcUzST+PeoGokB+YkHcYOfeTu30Y8UBpECgwMPGdi4sWOsnPi7JIrcB6dCQ4iyDyVtcl23yI70K6q9/xTVkj564tsL2A/zqOrxh4fwjdC4NbiCmSGh30lLCzEmAs6ZGfC7rl0nuWUz1sQS5cfBP5gcF1hzkwlzvQWkz1LXBRM3qbZC+qYqr/7F+i27//zhOpFjy6BIf137XeJElRnKnrwH1CLspRqefc14b5ceFKMzxNOFa+IVh1XHvSrytt/7CMZB0nlh0iC3KciGDlyUfWags552ZMytB62iZ39OymRUUTUC9LbYTRAEW64JjIpgTACNKse98aMLWWrYyxV9Y2bH3aE5XnO1pnlN4MsvoN/lDiyZKbQ== Passwordless SSH key for CI to upload documentation on mydomain.tld server
Now you are ready to setup the gitlab CI to automatically test and deploy your documentation.
Automate the tests and deployment of documentation
Basic Gitlab CI setup
On gitlab, once gitlab-runner has been setup and your test suite are set up, you
can describe jobs to be done in the file .gitlab-ci.yml, usually at the root
of the repos.
.gitlab-ci.yml not at the root of the repos
If your file .gitlab-ci.yml is not at the root of the repos, which is the
case for this project, you MUST setup the location of this file in your
project settings in your gitlab instance.
To do so, go to Settings > CI/CD on the left sidebar of your repo. Then expand General Pipelines section. And finally, update the subsection Custom CI configuration path as shown below (click on the image to enlarge):

By default, gitlab CI consider three default stages:
- test
- build
- deploy
CI test jobs
First task to do is to describe the test related jobs. Below is the content of
the .gitlab-ci.yml for this job:
Content of CI build jobs
# The job name, here called test
test:
  # At which stage the jobs should be done, here at `test` stage
  stage: test
  # Docker image to use to run the tests
  image: docker:latest
  # Setup variable required for this jobs if needed
  variables:
    # Activation of git submodules if needed
    GIT_SUBMODULE_STRATEGY: recursive
  # Setup environment before running actual test command
  before_script:
    # Add python dependencies
    - apk update
    # Install base package
    - apk add --no-cache --update-cache
        build-base
        python3-dev
        py3-pip
        bash
        git
    # Install virtual environment
    - pip3 install virtualenv
    # Create virtual environment
    - virtualenv .venv
    # Activate virtual environment
    - source .venv/bin/activate
    # Install production requirements
    - pip3 install -r requirements.txt
    # Install development requirements
    - pip3 install -r requirements.dev.txt
  # The actual test commands
  script:
    # Run tox test suite tools
    - tox
CI build jobs
Second task to do is to describe the build related jobs. Below is the content
of the .gitlab-ci.yml for this job:
Content of CI build jobs
# The job name, here called test
build:
  # At which stage the jobs should be done, here at `build` stage
  stage: build
  # Docker image to use to run the builds
  image: docker:latest
  # Setup variable required for this jobs if needed
  variables:
    # Activation of git submodules if needed
    GIT_SUBMODULE_STRATEGY: recursive
  # Setup environment before running actual build command
  before_script:
    # Add python dependencies
    - apk update
    # Install base package
    - apk add --no-cache --update-cache
        build-base
        python3-dev
        py3-pip
        bash
        git
    # Install virtual environment
    - pip3 install virtualenv
    # Create virtual environment
    - virtualenv .venv
    # Activate virtual environment
    - source .venv/bin/activate
    # Install production requirements
    - pip3 install -r requirements.txt
    # Install development requirements
    - pip3 install -r requirements.dev.txt
  # The actual build commands
  script:
    # Build the documentation
    - mkdocs serve
  # Register artifacts
  artifacts:
    # Paths to save as artifacts
    paths:
      - site/
As you can this this jobs differs in two mains things:
- It does not use
toxto test the documentation but only use the commandmkdocs buildto build the documentation. This command will produce a foldersiteat the root of the repos. - There is a new YAML key
artifactswhich point to this output folder. In fact the keyartifactstell to the runner to save the content of the defined path in an archive for later jobs, in our case for the deploy jobs.
CI deploy jobs
Third and last task to do is to describe the deploy related jobs. Below is the
content of the .gitlab-ci.yml for this job.
Content of CI deploy jobs
# The job name, here called deploy
deploy:
  # At which stage the jobs should be done, here at `deploy` stage
  stage: deploy
  # Docker image to use to run the deploys
  image: docker:latest
  # Setup variable required for this jobs if needed
  variables:
    # Activation of git submodules if needed
    GIT_SUBMODULE_STRATEGY: recursive
  # Setup environment before running actual deploy command
  before_script:
    # Add python dependencies
    - apk update
    # Install base package
    - apk add --no-cache --update-cache
        rsync
    # Ensure ssh configuration folder exists
    - mkdir -p ~/.ssh
    # Ensure permission on this folder are right
    - chmod 700 ~/.ssh
    # Trust your personal server public key
    - echo "$SSH_KNOWN_HOSTS" > ~/.ssh/known_hosts
    # Ensure permission on the previously written file are right
    - chmod 600 ~/.ssh/known_hosts
    # Start the SSH agent
    - eval $(ssh-agent -s)
    # Add the private SSH key to be able to connect to the perso LIRIS website
    - echo "$SSH_PRIVATE_KEY" | tr -d '\r' | ssh-add -
  # The actual deploy commands
  script:
    # Sync the content of the site artifact on your own server at define location
    - rsync -avz site/ "${ONLINE_DEST}"
As you can this this jobs differs in two mains from previous job:
- It
before_scriptYAML key is different. Indeed, to be able to usersync, and so SSH connection, to send your documentation online, different steps are required. - It uses environment variables which content is not defined in the YAML. This
is normal and will be tackle below. These environment variables are:
SSH_KNOWN_HOSTSSSH_PRIVATE_KEYONLINE_DEST
As described above, the last jobs required three variables to be set. But before settings them in the right place, we will first describe their content.
SSH_KNOWN_HOSTS, this variable will need to be set to the public SSH key of your server, the one you get in section The public SSH key of your serverSSH_PRIVATE_KEY, this variable will need to be set to the content of your previsouly generate passphrase-less SSH private key in section Your private SSH keyONLINE_DEST, the online destination where the static website, i.e. artifactsiteshould be uploaded, of the forusername@mydomain.tld:/path/to/target. If you specify folder limitation as we did in section Your private SSH key, then/path/to/targetis relative to the root of the specified folder. In our example, we want to upload to/www/sitewherewwwis in the$HOMEofusername, so value will beusername@mydomain.tld:/www/site
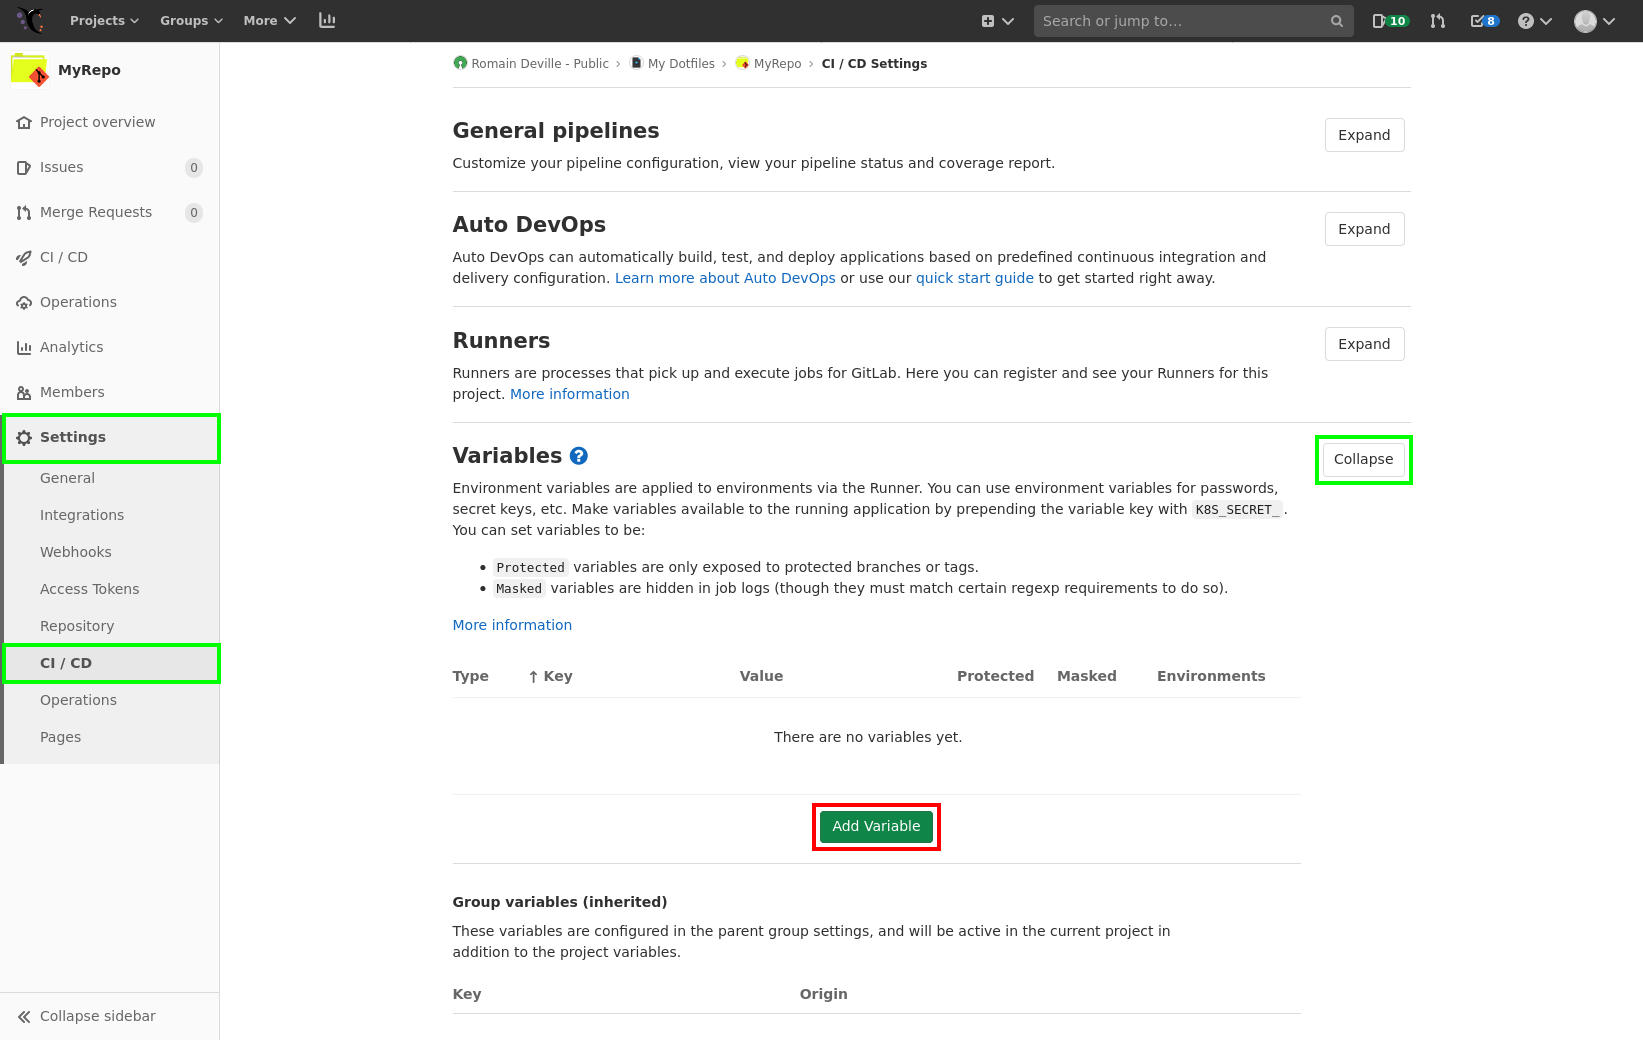
Now that we know the value of these variable, you can set it for the CI. To do so, go to Settings > CI/CD on the left sidebar of your gitlab instances. Then expand section Variables and then click on the Add Variable button.
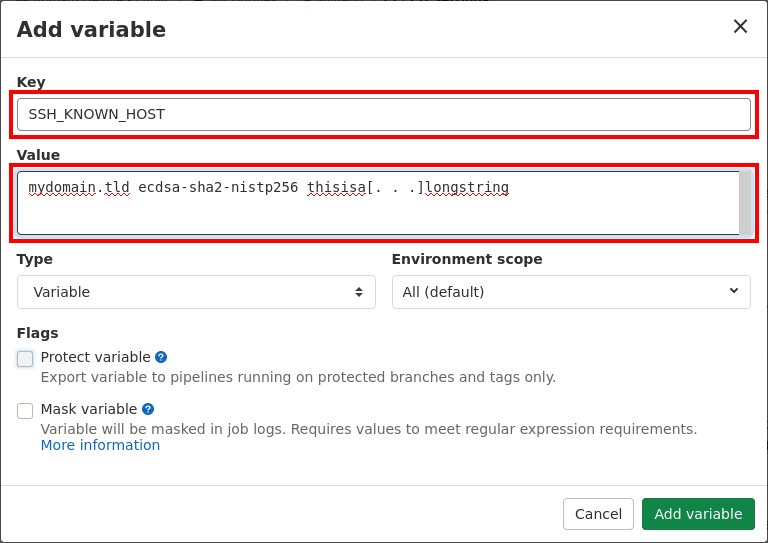
An overlay window should appear, fill the Key and Value field with the
keys and value described above, i.e. SSH_KNOWN_HOSTS, SSH_PRIVATE_KEY and
ONLINE_DEST.
This should update the list in CI variables:

And that is all. Now each time you push your repo, it will be tested, the documentation website will be computed and automatically uploaded. You can see the state of this automation in CI/CD on the left sidebar of your gitlab instance.
Going further with gitlab CI
Normally, there should already be a file .gitlab-ci.yml in the root of the
repo with lots of content. The content of the file is based on :
- The Gitlab CI/CD Pipeline Reference Configuration
- A special YAML feature called anchor which is supported by Gitlab CI/YAML Anchor
Please read carefully previously linked documentation and read the
.gitlab-ci.yml file, which have lots of comment in it to help you understand
what is done.
This CI manage two different kind of pipeline:
- A development based one, which test the script, build the doc and deploy it online but in a temporary folder. This pipeline is automatically run on every gitflow compliant branch (except master branch) and on merge requests.
- A production based one, which test the script, build the doc and deploy it online in the production folder. This pipeline is automatically run on master branch, i.e. when a release is done.