Mkdocs Tutorials
This repo which render the documentation is based on the tool mkdocs.
Here is a little tutorial on how to add a page to the documentation.
Setup your working environment
First, install the following external software which are required:
- bash >= 5.0
- python3 >= 3.8
- pip3 (using python >= 3.8)
- python3-venv (using python >= 3.8, or directly
python3.8-venvfor debian based distros)
Hint: Usage of direnv is strongly recommended
direnv is not a required dependency but it is strongly
recommended to use it.
As many tools used by this repo required environment variables, we strongly recommend using direnv to automate loading of these environment variables.
direnv is an extension for your shell. It augments existing shells with a new
feature that can load and unload environment variables depending on the
current directory.
In other terms, if a script .envrc is present in a folder and allowed for
direnv, it will automatically be executed when entering the folder. When
leaving the folder any exported variables will be automatically unloaded.
Moreover, usage of direnv will not be explain here.
Then, you will need to clone this repo:
# Clone with HTTPS
git clone https://framagit.org/rdeville.public/docs_romaindeville_fr.git
# Clone with SSH
git clone git@framagit.org:rdeville.public/docs_romaindeville_fr.git
Finally, you will need to install python required dependencies to be able to use
the main.py script:
# Create python virtual environment
python3 -m venv .virtualenv
# Activate the virtual environment
source .virtualenv/bin/activate
# Install python production required dependencies in the virtualenvironment
pip3 install -r requirements.txt
# Install python development required dependencies in the virtualenvironment
pip3 install -r requirements.dev.txt
Work on the documentation
Second thing you need to know is you can work on the documentation and live see your modification. To do so, once your working environment is ready, simply type the following command :
# From the root of the repo
mkdocs serve
You will have an output similar to the following:
INFO    -  Building documentation...
INFO    -  Cleaning site directory
INFO    -  Documentation built in 0.27 seconds
[I 200602 10:31:44 server:296] Serving on http://127.0.0.1:8000
INFO    -  Serving on http://127.0.0.1:8000
[I 200602 10:31:44 handlers:62] Start watching changes
INFO    -  Start watching changes
[I 200602 10:31:44 handlers:64] Start detecting changes
INFO    -  Start detecting changes
Doing so, you will be able to access the documentation on http://localhost:8000
Add a new page
By default, mkdocs generate the architecture of the documentation based on the
architecture of the documentation folder, the docs folder.
If you want to add new page, you will have two step to follow:
- Add the page to the navigation in the mkdocs configuration file
- Add the file to the architecture of the documentation
Add the page to the mkdocs configuration file
First thing to do when adding your page is to add it to the mkdocs.yml
configuration file under the nav key.
For instance, let's assume you want to add a "chapter" called "User Guide" with two page within, "Installation" and "Quick Start"
You will need to add the following content in the mkdocs.yml file:
nav:
  - Home: index.md
  - User Guide:
    - Installation: user_guide/installation.md
    - Installation: user_guide/quick_start.md
Add the file to the architecture of the documentation
Once this is done, you will need to add the file corresponding, otherwise you will see following warnings:
WARNING -  A relative path to 'user_guide/installation.md' is included in the 'nav' configuration, which is not found in the documentation files
WARNING -  A relative path to 'user_guide/quick_start.md' is included in the 'nav' configuration, which is not found in the documentation files
To do so, simply create the corresponding files:
touch user_guide/{installation.md,quick_start.md}
You can now write in this files the corresponding documentation with you favorite test editor.
Writing documentation
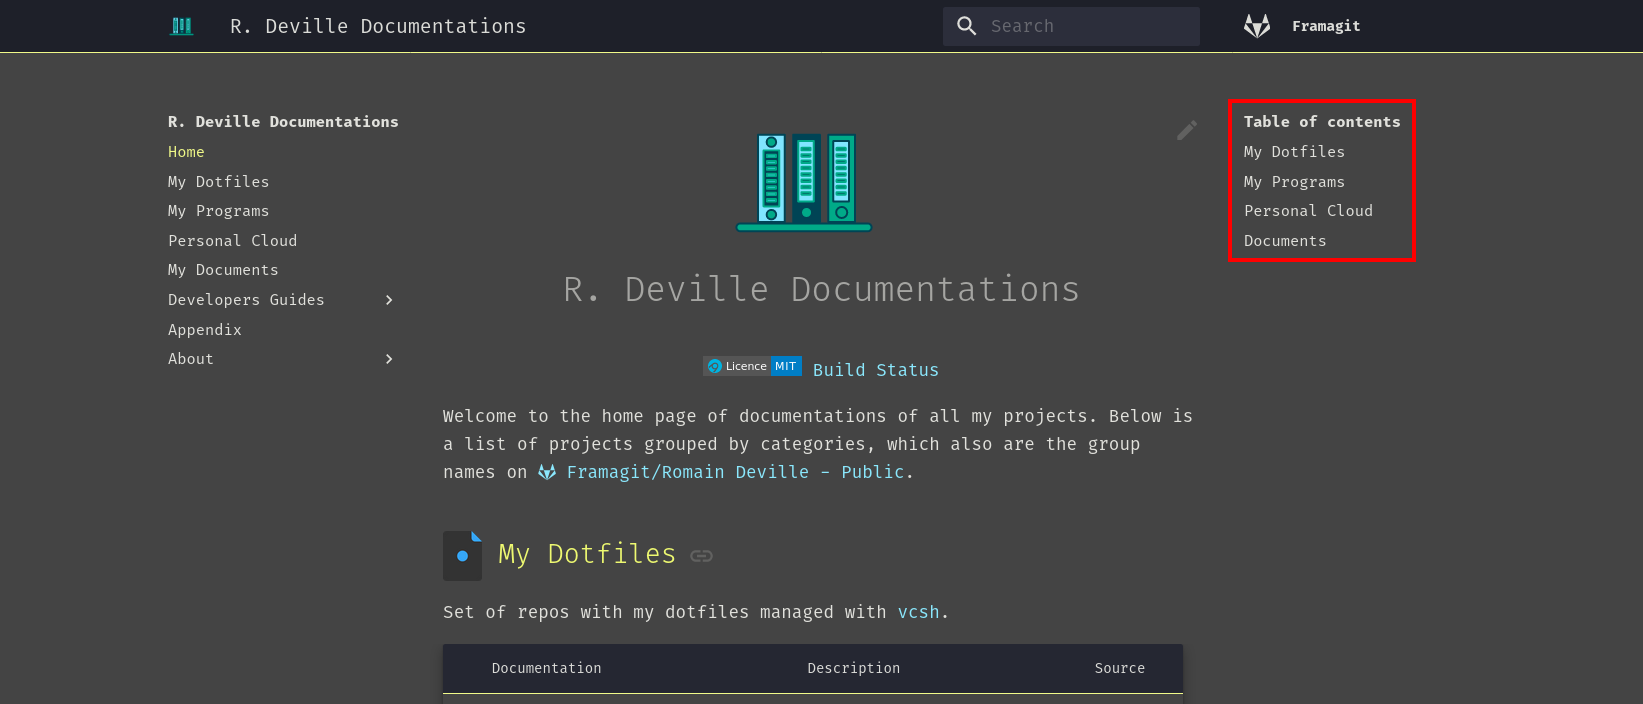
When writing your documentation, the theme used in this documentation will generate a right sidebar with the table of content of the current page, as shown in the image below:
This TOC sidebar is automatically generated based on the section depths of the markdown file.
REMARK The top section of markdown title is not used in the TOC sidebar, it is only used as a title of the page. For instance, assuming the following page extract:
# Title

## Section 1

Lorem Ipsum

## Section 2

### Subsection 2.1

Lorem Ipsum

### Subsection 2.2

Lorem Ipsum
The TOC sidebar generated will be:
  Section 1
  Section 2
    Subsection 2.1
    Subsection 2.2
References
For more information, please refer to:
