Developers Guidelines
This document will describe main guidelines for developers who want to contribute to this repo. It rely on other documentation in this repo for which link will be provided when needed.
The aim of this document is to describe how to help development of this project, what style code I used and I preferred, and how to properly contribute.
Most of this guidelines are not mandatory, its mainly to make code more homogenous and help people to understand what is done in the code.
Development
Workflow
The repo use git flow branching model, for more information see:
In other terms and to summarize, pull request should be done on develop branch of
the main repo as master branch is only for releases.
To help you following this branching model, you can use git flow command. To
install this command, see:
- git flow to install package
- git flow cheatsheet
Branches should start with prefix feature-, bugfix-, release- andhotfix-.
Any branches on the main which does not follow this syntax will not be allowed and will be deleted.
Important
The main repo is hosted on framagit.org/rdeville/dynamic-prompt, issues, merge request, etc. may not be considered if posted on other plaforms.
Moreover, only branch master is available on other platforms.
Why ? (click to reveal)
Because I :
- prefer to use self-hosted git solution even if I use other platform as mirror,
- prefer to use solution for which I know that people behind defend same motivation as mine,
- am french, so I want to use "local" plateform,
- know that framasoft servers are in E.U and so are submit under the E.U. law.
Exept for the main developpers, master, develop, release-*, hotfix-*
branches are protected. You will not be able to push directly on these branches.
For now, main developpers are:
- @rdeville
Yeah, only me, but if you are intersted to invest in this project, you are
welcome  .
.
Style code
If you want to help developing this repos, here are some code styles I used :
-
When using
functionor method,for,while,caseorif, put respectively{,do,do,esacandthenbelow the condition to test.Example (Click to reveal)
functions name() { case $1 in [a-z]*) echo "Alphabet" ;; [0-9]*) if [[ $1 -lt 5 ]] then echo "Number less than 5" else echo "Number greater than 5" fi ;; *) echo "Unknown" ;; esac } -
When using
fororwhileloop, prefer using variable starting withifollowed by an explicit name than simplyi,j, etc.Example (Click to reveal)
age_array("10" "15" "17" "22" "35" "40") for i_age in "${age_array[@]}" do echo "You are ${i_age} years old." done -
Use 2 indentation space when defining a scope (method, loop, condition, etc.).
Example (Click to reveal)
func() { people=("Alice" "Bob" "Carol" "David" "Eve") for i_people in "${people[@]}" do if [[ ${i_people} =~ a ]] then echo "${i_people}" else echo "I do not tell people name which does not have an 'a'" fi done } -
When using "advanced" bashism, such as string substitution, write a comment above describing what you do in human readable format.
For more informations about what I consider string substitution, see tldp.org-String Manipulation, this is not mandatory but is here to help people not used to these syntax to understand what is done.
Example (Click to reveal)
A="abcdabcda" # Replace 'cd' in ${A} by 'zy' B=${A/cd/zy} echo $B # Remove everything in before the last occurence of 'a' C=${A##*a} # Remove everything after the first occurence of c D=${A%%c*} -
Document your method with a "docstring" like.
Example (Click to reveal)
function func_name() { # This is a docstring like expliciting what func_name do # *PARAM $1: string, explicit description of the required (`*`) expected string # PARAM $2: string, explicit description of the optional expected string # NO PARAM: -> Means that NO PARAM is required or optional for this # function } -
Do not write more that 80 char lines of code, except when there is no other options or when using
echo.Why ? (click to reveal)
Because I often have two or three code files open in splitted screen in vim, thus showing only 80 char per file.
-
All variable should be in lowercase execpt for configuration and constant variables that can be set in configuration files
host/folder which are in uppercase. Prefer to use_between words in variable name. And when using variables, use{}around the variable usage.Why ? (click to reveal)
The lowercase is to make differences between constant/user defined variables and the computation variables.
The
_between word is to make variable name more human readable.The
{}may add a heavy layout of reading but as I use lots of arrays and string manipulation, I now tends to use them all the time. Moreover this avoid issues like shown below:var="filename.sh" # When not using `{}`, line below will search for value of variable # `var_temp` instead of printing the value of ${var} + "_temp" echo "$var_temp" # While this line print ${var} + "_temp" echo "${var}_temp"Example (click to reveal)
git_username="Firstname Lastname" git_usermail="username@domain.tld" echo "${git_username} < ${git_usermail} >" -
End your code files with a vim modeline.
Example (click to reveal)
I usually tend to be explicit in my modeline:
But a shorten modeline is valid too:# *********************************** # EDITOR CONFIG # vim: ft=sh: ts=2: sw=2: sts=2 # **********************************This modeline tells to vim that# vim: ft=sh: ts=2: sw=2: sts=2ft=sh: filetype isshts=2: tabstop should be 2 space widesw=2: shiftwidth should be 2 space widests=2: replace tab by a 2 space indent
Important
As stated above, this code styles are not mandatory but here to provide guidelines. Moreover, I'm open to discussion to use other guidelines.
Below is an example using these code styles:
#!/bin/bash

# Description of the script. Which simply print the content of an array but
# replace value "item" of each cells by "toto-item" if item index is pair and
# "tata-item" if index is odd

method()
{
  # Print value of array but replace "item" by toto-item if item is pair and
  # tata-item if item is odd.
  # NO PARAM

  local my_array("item0" "item1" "item2" "item3")
  local idx_item=""

  for i_elem in "${my_array[@]}"
  do
    # Extract index of item that is at the end of the string
    idx_item=${i_elem##item}
    if [[ $(( idx_item % 2 )) -eq 0 ]]
    then
      # Replace item by toto-item
      echo "${i_elem/item/toto-item}"
    else
      # Replace item by tata-item
      echo "${i_elem/item/tata-item}"
    fi
  done
}

# *****************************************************************************
# EDITOR CONFIG
# vim: ft=sh: ts=2: sw=2: sts=2
# *****************************************************************************
Debugging
There are two variables that can be usefull and should mainly be used only using
export command directly from the user input. These variable are DEBUG_MODE
and DEBUG_LEVEL.
DEBUG_MODE variable
When this variable is set to any value, then the prompt will automatically activate all used segments. Those which does not have real informations to show will be filled with fake value.
This variable is usefull to see how your prompt look like when all segments are loaded and/or when debugging.
Below is an example of such behaviour.

DEBUG_LEVEL variable
This variable have for possible value:
ERROR(the default value), print only errors informationTIME, print errors and the time of computation of the promptWARNING, print errors, the time of computation and warnings.INFO, print a lots of informations, errors, time of computation and warnings.DEBUG, print a lots more output, debug information, basic information, errors, warning, and time of computation.
When set, computation of the prompt will output some debug information depending
on level sets. The more level is close to DEBUG the more informations will be
outputed. This is done through the script lib/debug.sh, for more information see
Debug Script Documentation.
This variable should not be set to WARNING, INFO nor DEBUG except when
debugging because setting these values will prompt lots of information and make
your prompt unusable as shown below:

Versionning & Contribution
When developping and mainly commiting, try to make "beautiful" commits, with a title and a description of what is done.
If your modification can be written in one line title (i.e. less than 50 char), for instance, writing documentation in the README.md, avoid commit message like "Update README.md", prefer "Update section XXXX in README.md" or even better :
Update section configuration in README.md

Add/Update section configuration witch describe how to configure your prompt and
link to the related documentation.
gitmoji in your commit is appreciated but not mandatory. Moreover, if you use gitmoji, please use them only as quick describer of what have been done in the start of your commit/merge request. Please do not use more than 5 gitmoji. The idea is that if we hide the commit title, just showing the gitmoji, we should be able to quickly know what have be done on the commmit/file.
But I understand that sometime you are not used to do this or you may not have time or you have a huge commit wich only do one thing (for instance, 30 update files, which is only updating documentation).
Thus, above advice about commit are not mandatory, but merge request MUST
follow the "beatiful" merge request guideline. Merge request with only title
"merge branch on develop" will need to be updated before being accepted.
Finally, when contributing, i.e. propose a merge request, ensure that your
personal configuration files, i.e. files in hosts/ folders, are not
versionned.
Moreover, if adding a new feature, ensure documentation of this new features has been added to the documentation of the project.
As example, you can follow the tutorial below which describe how to add a new segment and propose a merge request.
Tutorials
Well, there are a lots of things to do. Let us do a little tutorial to apply this guidelines.
This tutorial will follow this workflow to add a new segment, the date segment:
- Fork this repo,
- Create a branch corresponding to what you want to do,
- Work on this branch, make your own modification,
- Ensure your modification are documented and pass the tests,
- Once finished and tested, your can merge this branch to your branch,
- Prepare your merge request,
- Propose a merge request on the main repo.
As an example, this tutorial will rely on the tutorial Add your own
segment which describe how to add a segment. So this tutorial will
propose a new feature, which is a segment called date.
1. Fork this repo (Optional)
To do so, please read Keep your configuration.
This step is optional, as you can work directly on the main repo by creating
branch corresponding on what you are working on like feature-* or bugfix-*.
But it is the prefered method if you want to keep your configuration and be free
to name the branch whatever you want.
2. Create your working branch
As in this exemple we will develop a new segment to show the date, it is a new
feature, so the new branch will be named feature-segment-date.
# Create the branch and directly go to it
git checkout -b feature-segment-date
Note
If you plan to update the documentation, the branch name may be like
feature-doc-section-name, if it is a bufix, the branch name may be like
bugfix-name-of-the-bug, etc. This naming convention is only if you wish to
work directly on the main repo, you are free to name the branch whatever you
like on your own fork.
3. Work on this branch
Then, code the segment date, to do so, see the tutorial provided in
Add your own segment. Or develop whatever you want, like updating
the documenation, fixing a bug, etc.
Three tutorials are provided to help you:
- Add your own segment: Describe how to add a segment.
- Add terminal support: Describe how to add your terminal to the list of supported terminal.
- Add/Update documentation: Describe how to update the current documentation.
4. Performance & documentation
Before merging your working branch on your main branch in your own repo, ensure your work does not impact the prompt performance, i.e. prompt should be printed in less than 250 ms in average.
To do so, you only need to run the scripts ci/ci.bash and ci/ci.zsh (while
the second is optional if you do not use zsh, the first is mandatory).
This will compute 100 times the prompt for both version v1 and v2 with all supported segment, even your last developped segment will automatically be added to the tests.
It will show you one rendering of the prompt using all segment, even the one you just developped, for each version, and will prompt the average time for 100 computation of the prompt as shown below.
If your prompt is compliant with this performance tests, you must also check
if its syntax is correct by using the script ci/shellcheck.sh. This will run
the tool shellcheck on all the scripts of this repo.
Notes
Often, shellcheck errors/warnings/infos cannot be fixed, like SC2168:
'local' is only valid in functions. You can disable these warnings but you
MUST provide an explaination as shown below:
# shellcheck disable=SC2168
#  - SC2168: 'local' is only valid in functions.
#            This error is normal as this file is sourced within a function
If you remark that I have forgotten an explaination, do not hesitate to
raise an issue  .
.
Finally, does not forget to document your work. Your code should be documented
and if you add a new segment, ensure to write the corresponding documentation in
docs/configuration/segments as described in Add your own segment.
You can also take a look to Add/Update documentation to help you writing your documentation.
Important
These two steps (CI and documentation) are not mandatory if you do not plan to propose your work as a merge request to the project dynamic prompt.
But if you want to contribute, these step are required because they are what is done in the Continuous Integration. If your work is not compliant, your contribution will not be accepted. You will need to push the working branch directly.
5. Apply your modification
Now you have finish your work, in this tutorial it is the segment date, you
can merge this feature into your develop or master branch (you are free of
your branch management in your own fork).
git checkout develop
git merge feature-segment-date
Important
If you did not make a fork of the repo, when merging your branch to master
or develop, you will have no issues. But when pushing your modification,
these modification will be rejected as branch master and develop are
protected on the main repo.
6. Prepare your merge request
Before proposing your merge request, ensure that :
- Your files in
hosts/folder are not versionned, especiallyhosts/common.shand yourhosts/$(hostname).shfiles. - Your work is documented:
- In its code,
- If it is a new segment, ensure that the corresponding documentation is
up to date in folder
docs/configuration/segments/, see Add/Update documentation.
- Your work is working for:
bash(andzshif you are using it)- v1 and v2 of the prompt
To do so, do not hesitate to use scripts tool/test, ci/ci.zsh, ci/ci.bash
and ci/shellcheck.sh.
See Scripts documentation to have link to usefull scripts to help you preparing this merge request.
Do not forget to make screenshot of this segment in a prompt line for the merge request.
7. Propose your merge request
Finally, you can propose a merge request. To do so, if your fork is not on framagit.org, you may need to push it on this platform.
To do so, create an account on framagit.org. Then, create an empty
repo by clicking on the + on the top left then new repo as show below:

Then, create the remote on your local folder and push your repo:
git remote add upstream-fork https://framagit.org/<USER>/<REPO_NAME>
# To be sure, push all your branch, or if you know, push only needed branches
git push upstream-fork --all
Then propose your merge request on the branch develop of the main repo, as
explain below. This is the most generic way, if you are familiar gitlab, you may
know faster way to do it.
- Go to the framagit repo
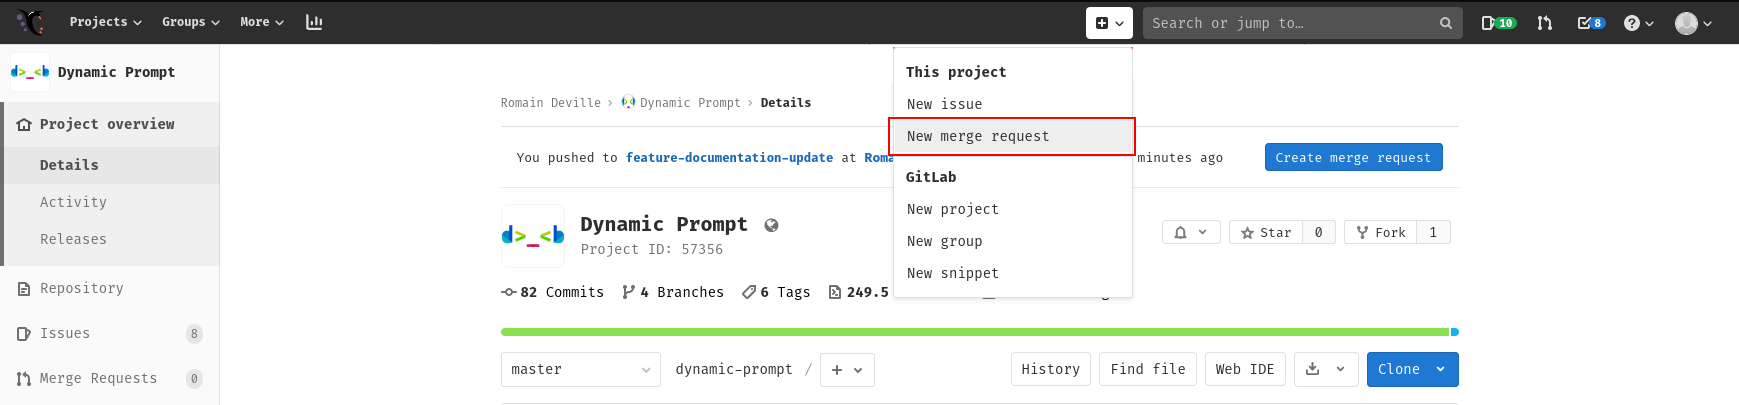
-
Start a new merge request
-
Select the branches
At this step, you will need to select the branch
developon the framagit repo and the branch for which you want to submit a merge request.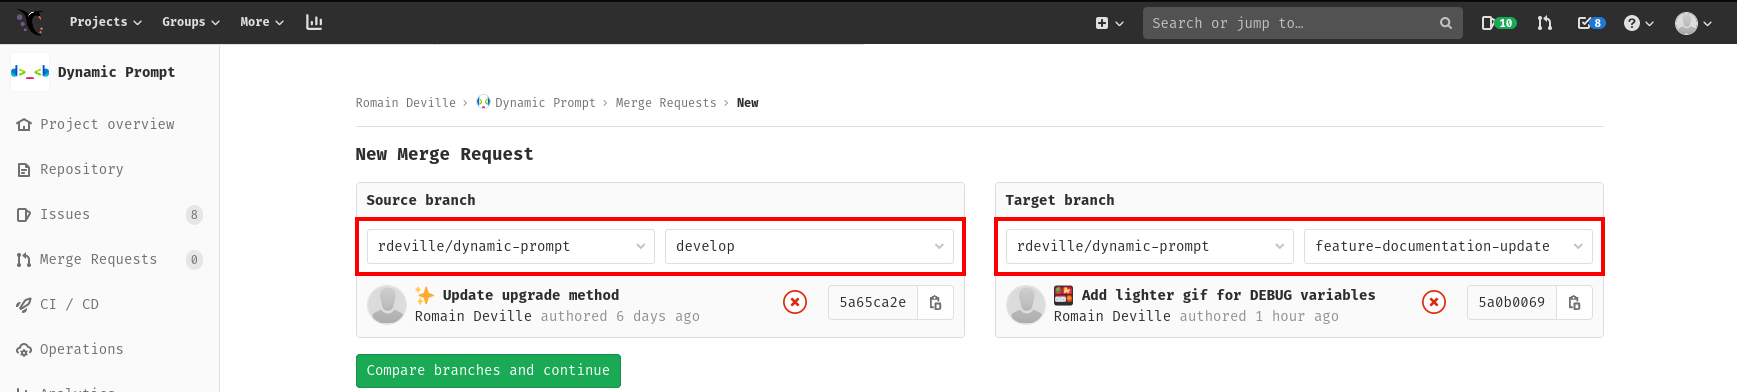
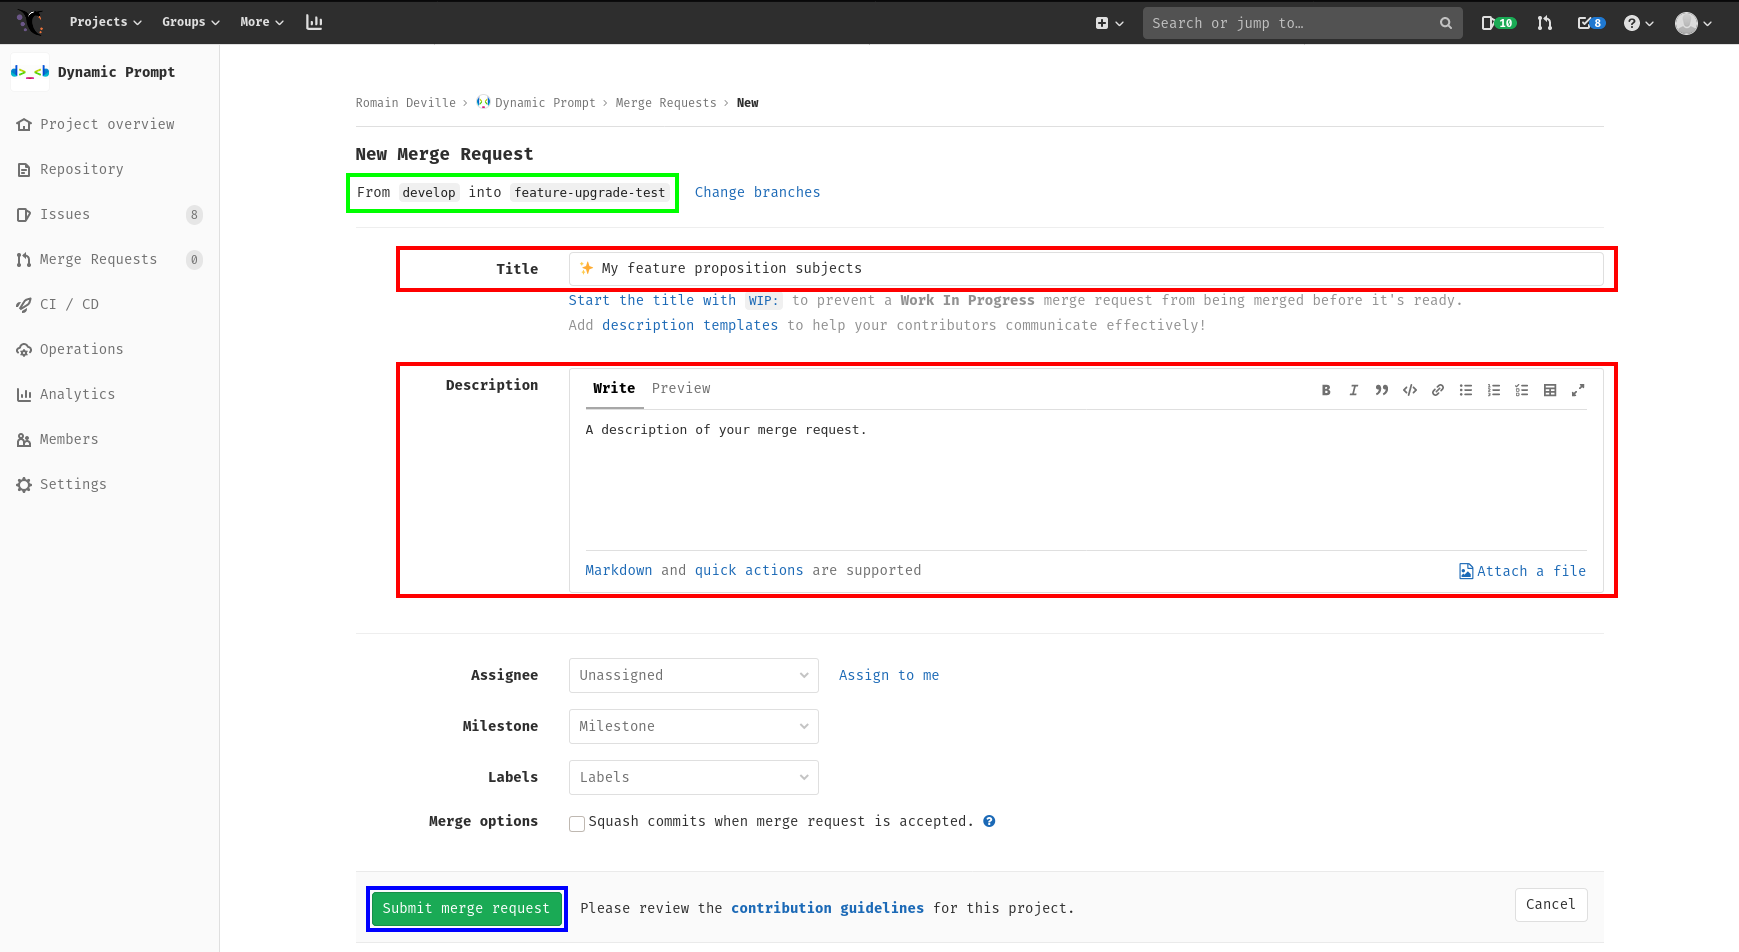
-
Describe your merge request
On the next screen, you will be confirmed the branch from and to for which you want propose a merge request (green rectangle). You will also be asked to described your merge request (red rectangle). Please be as explicit as possible as explain in section Versionning & Contribution. Once you are statisfied with your merge request you can submit it (blue rectangle).
-
Review your changes (optional)
Below the submit button you will be able to view a graphical diff of your merge request. You can review this changes if you want before submitting your merge request.

That all for the developer guidelines, you can now add a new features .
Start adding new features
Finally, you can start the development of a new feature. To guide you, you can take a look the following tutorials:
- Add your own segment: Describe how to add a segment.
- Add terminal support: Describe how to add your terminal to the list of supported terminal.
- Add/Update documentation: Describe how to update the current documentation.