Configure your prompt
This page present you the starting point of using dynamic prompt, address unicode support and color support as well as the location of configuration.
- To setup the segment organisation see Prompt lines configuration
- To setup general variables see General variables
- To configure segment you use see All suppport segments
Setup the prompt
Note
If you are testing the prompt in docker using the script test.sh, see
Testing your prompt, this part is not required as it is done
automatically in the container.
It is only required when you are ready to use the dynamic prompt outside the container.
Before configuring your workstations prompt coloration, chars, etc. and as quickly described in the Home Page, there are some global variables that need to be exported.
This is done by adding some lines in your ~/.bashrc and/or your ~/.zshrc
depending on the shell you use.
- In your
~/.bashrc:
# Or whereever you clone this repo
export PROMPT_DIR="${HOME}/.shell/prompt"
# The prompt version you want to use, "1" or "2"
export PROMPT_VERSION="2"
# Not required, but sometimes, the shell emulator variables is not well set
export SHELL="/bin/bash"
# Not required, but you can force to ensure usage of unicode or true colors
export SHELL_APP=<the name of your terminal>

# Source the file that will setup the prompt computation.
source "${PROMPT_DIR}/prompt.sh"

# Explicitly tell bash to use method precmd before letting user to type command.
if ! [[ "${PROMPT_COMMAND}" =~ precmd ]]
then
  export PROMPT_COMMAND="precmd;${PROMPT_COMMAND}"
fi
- In your
~/.zshrc
# Or whereever you clone this repo
export PROMPT_DIR="${HOME}/.shell/prompt"
# The prompt version you want to use, "1" or "2"
export PROMPT_VERSION="2"
# Not required, but sometimes, the shell emulator variables is not well set
export SHELL="/bin/bash"
# Not required, but you can force to ensure usage of unicode or true colors
export SHELL_APP=<the name of your terminal>

# Source the file that will setup the prompt computation.
source "${PROMPT_DIR}/prompt.sh"

# No need to add PROMPT_COMMAND for zsh, as it use method precmd, defined in
# ${PROMPT_DIR}/prompt.sh, before letting user to type command.
The SHELL_APP variable
There is a special variable for which you might not know the value to set. This
variable is SHELL_APP.
# Not required, but you can force to ensure usage of unicode or true colors
export SHELL_APP=<the name of your terminal>
This variable should normally be automatically set, so its not required.
It allows dynamic prompt to know if your terminal support unicode and which kind of colors it is able to display. Indeed, this dynamic prompt is able to support true colors, 256 colors and 8 colors as well as unicode characters. But this mainly depends on the terminal emulator you use.
Normally, the value of this variable is set automatically by dynamic prompt by
calling the script tool/which_term.
To know the name of the terminal that will be used by dynamic prompt, run the
script tool/which_term.
This script will output a value which is then compared to arrays
UNICODE_SUPPORTED_TERM and TRUE_COLOR_TERM in
lib/default_vars.sh
If you know your terminal emulator support:
- Only unicode character but not true colors, set the value
of
SHELL_APPtoxterm. - Unicode character and true colors, set the value of
SHELL_APPtost.
Doing so will force dynamic prompt to emulate usage of xterm or st
behaviour.
If you set SHELL_APP to one of this value and you still experience weird
segment characters and/or weird segment separator as shown below:
- Prompt v1 (click on image to enlarge)

- Prompt v2 (click on image to enlarge)

This might come from the fact your terminal emulator does not use font with the specific unicode characters (or glyphs). I recommend using a Nerd Font. Personnaly I use FiraCode which is the one used for all screenshots done. And set your terminal emulator to use one of these fonts.
If this still does not work, please see sections Unicode Support and Colors support. You can also see Add terminal emulator support where these issues is adressed more in details.
Important
When on tty or in unsupported terminal emulator, prompt will automatically
fall back to prompt v1.
Warning
If you use shell framework, like bash-it, oh-my-zsh or prezto. Their support is not tested yet and can lead to messing your prompt.
Unicode Support
If you do not see default values or your characters are not printed correctly, this means either :
- Your terminal emulator does not support glyphs or unicode encoding, even if using font which support them,
- Your terminal emulator does support glyphs but the font you choose does not,
- Your terminal emulator does support glyphs and the font you choose does too, but you will have to modify a scripts in this repo.
If it is the first case, unfortunately, you will not be able to print any unicode character.
If it is the second case, please see the documentation of your terminal emulator in order to know how to change the font it uses.
If it is the last case, you will have to add your terminal name in the array
UNICODE_SUPPORTED_TERM in the file lib/default_vars.sh, or when testing, you
can manually set variable SHELL_APP like this :
## If your terminal emulator support unicode but not true colors
export SHELL_APP=xterm
## If your terminal emulator support unicode and true colors
export SHELL_APP=st
Font recall (again), some default character in common.example.sh are better
interpreted when using NerdFonts. Personnaly I use
FiraCode which is the one used for all screenshots done.
To know the name of the terminal to put in the variables TRUE_COLOR_TERM or
UNICODE_SUPPORTED_TERM, run the script tool/which_term.
More details are provided in Add terminal support.
Colors support
Some terminal emulator support only 8/16 colors, others 256 colors and others support true colors, i.e. 24 bits colors. Depending on which terminal emulator you use, you might need to setup colors syntax according to the number of colors supported by your terminal emulator.
For more information about the syntax for terminal that support up to 16 colors or up to 256 colors:
To know if your terminal support true colors (i.e. 24 bits colors), see:
IMPORTANT, when setting colors variables, you do not need to write the full syntax, just enter the color code. The surrounded of the color code will be set by dynamic prompt depending on your terminal. Example of value are shown below:
| Color | 8 colors | 256 colors | True colors |
|---|---|---|---|
| Red | 1 | 196 | 255;0;0 |
| Green | 2 | 046 | 0;255;0 |
| Blue | 4 | 021 | 0;0;255 |
Important
When setting fall back colors, i.e. like in common.example.sh, when
terminal support only 16 colors, like tty, please use only 8 colors code
because 16 colors supported is guaranted. In other terms, when using
fallback colors, value of colors variables should be between 0 to 9 where 0
is black, 9 is white and 1 - 8 are the 8 primary colors of your terminal.
This depend on your terminal.
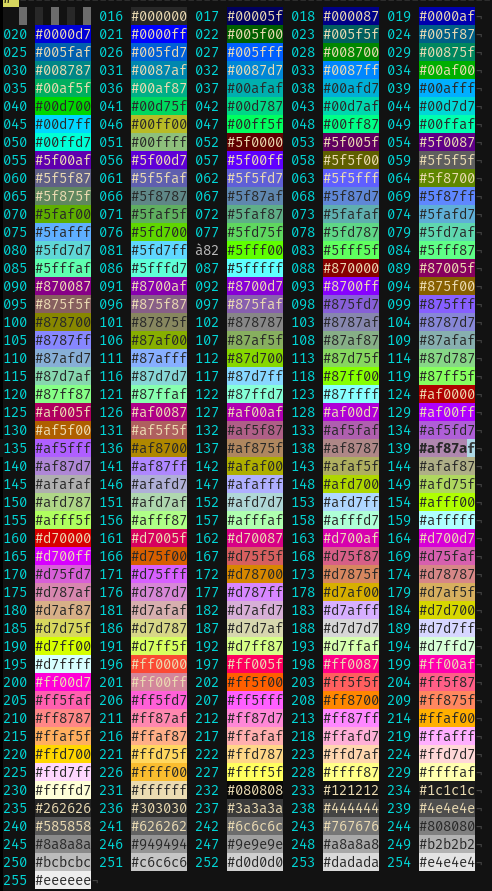
Set of 256 colors supported by 256 colors terminal are shown at the end of the
file common.exemple.sh and in the image below. The number on the left of
hexadecimal colors value is the code of this color in 256 colors support.
If you know your terminal emulator should support true colors but does not print
them, you will have to add your terminal name in the table TRUE_COLOR_TERM in
the file lib/default_vars.sh, or when testing, you can manually set variable
SHELL_APP like this :
## If your terminal emulator support unicode but not true colors
export SHELL_APP=xterm
## If your terminal emulator support unicode and true colors
export SHELL_APP=st
To know the name of the terminal to put in the variables TRUE_COLOR_TERM or
UNICODE_SUPPORTED_TERM, run the script tool/which_term.
More details are provided in Add terminal support.
Configuration files
One of the aims of this prompt is to be as easily customizable as possible. It end up by setting almost all configuration to variables. Variables are :
- colors of a segment, background and foreground colors mainly
- special character that start a segment
Prompt v1 and v2 share almost all variables, just some of them are useless in prompt v1 (mainly background colors variables).
To setup a configuration for your workstations, everything is done in the
hosts folder of the repo. There, you will have two possibilities:
-
Create a common configuration shared by all your computer. This can be done by creating a file
common.shin thehostfolder in the repo. -
Create a file specific for each computer. This can be done by creating a file which name is the hostname of your computer (for instance, the file
death-star.shis a configuration for one of my computer which hostname isdeath-star) in thehostfolder in the repo.
Note
I strongly recommend copying the file common.example.sh as a starting
point as common.example.sh provide a complete configuration for :
-
Prompt v1 and v2.
-
Terminal emulator that support unicode or not
. See Unicode Support -
Terminal emulator that support true colors, 256 colors and 8 colors
. See Color Support -
Lots of comment to help you making your own configuration.
Finally, you can combine both, create a file common.sh to set some default
variables for all your computers and another file with name $(hostname).sh to
setup specific configuration which will override the common ones.
Alreay in this repo are files:
common.example.shwhich is a basic complete configuration. It is the one used in all this documentation, moreover its already handle multiple configuration whether your terminal emulator support unicode chars and true colors.death-star.shwhich is the specific configuration of my computer which hostname isdeath-star. In this file, I only overwrite variables that define the default background color of my prompt, i.e. the color of the main line of the prompt.
All variables in these files are optional. If not set, dynamic prompt will load default values, i.e. black background and white foreground as shown below when not configuration exists.
- The v1, "classic" version

- The v2, "powerline" version

All modifications done in files in hosts/ folder will be loaded dynamically,
i.e. no need to reload anything once modified as they will be automatically
reloaded. See the gif below:
Configuring Prompt Lines
That's being said, there is now three things two configure:
-
The organisation of the segment within your prompt lines
Before starting customization of colors, chars, etc., you will need to configure which segment you want to activate/deactivate and the order in which they are displayed and compressed.
To do so, see Prompt Lines Configuration -
The general variables for prompt v1 and prompt v2
Then once you have choosen the order in which segment are organised you may want to configure general variables for prompt v1 and v2.
To do so, see General variables -
The segments colors and characters
Finally, once this is done, you may want to configure your segments, i.e. their background and foreground colors mainly.
To do so, see All supported segments.